Wednesday, August 24, 2011

My dorm room!


Hey ladies! Long time no post! Sorry I haven't been posting much but as you read from my previous post I was starting to move back on campus to start school.  This will be my last semester so packing nail polish was a little difficult for me because my mom told me just to pack 5-8 nail polishes and that is what I did.  So I probably wont be doing much nail designs everyday but once a week would be doable for me.  I know this is a nail polish blog but I think its nice to see other stuff besides nail polishes.  Today was my first day of class and I got 4 classes every MWF so its going to be a longggg semester =p.  The best thing about moving in is getting to decorate your room, well at least that's my favorite part.  My school requires everyone to live on campus for 4 years which is really nice if you don't have a car.  I finally got done unpacking and decorating my room and I really do love the way it turned out.  The dorm rooms at university are usually really plain and very white! I wanted to make my room a bit more cozy so I decided to add a lot of stuff to the walls like posters, tapestry ,which made a big difference in my room, Drapes and more personalize things like photos of your family and friends.  I hope these pictures will help give you ideas on how to decorate your dorm room when you guys go back to school!

  1. Posters and tapestry: You guys can get this at beyond the wall.com but for me, once a year at the beginning of school year my school would hold a poster sale and I would just buy them there.
  2.  Bedding: I got my duvet cover from target, it is part of their shabby chic collection.  My down blanket is from charter club in macys. My throw and pillows are from Brookstone
  3. my drapes are from target and a bunch of other nick nacks are as well
  4. Tv from best buys
  5. fridge from costco, microwave from walmart
  6. coffee maker from overstock.com you can find really good deals here
  7. my picture frames and most of the stuff on those shelves are from marshals! Best place to find great decor for your dorm room 


View from my bedroom window
Chilis view from my bedroom window


Sunday, August 14, 2011

Matte Vampy nails


Hey Ladies.. Sorry for the lack of creative name for this mani im posting today.  Its been a while since I did my nails but I did this a few days ago and I was busy packing to post them.

 This was a very simple nail for me because I couldnt think of anything more creative =]
 So what I did was paint my nails a dark polish and decided to use a matte top coat to create a really cool base for my stamping grounds.  This stamps reminds me of a print vera bradley would print on their bags but more brightly color of course =]

What I used:
  •  opi Siberian nights ( I feel like all dark colors all look the same.. =/)
  • Essie- matte about you top coat
  • china glaze millenium as a stamping polish for the image plates I got from born pretty website.. the image seems to be working very well if you might ask =]

Anyway I hope you guys enjoy this simple look.. Will be back with another look later today if im not too busy.


Monday, August 8, 2011

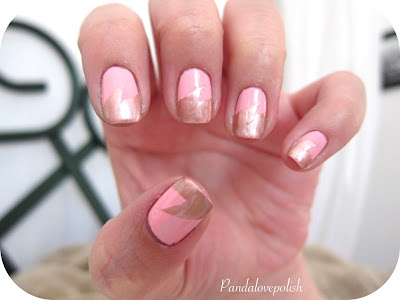
Pink lighting bolt nails


Hey guys! I did this nail design base on what I saw on Nailside and I wanted to try to attempt this double lighting bolt again. I tried this maybe 4 times before but never turned out good.. This actually took a really long time but I really loved how it turned out a lot. You probably cant see the gold lighting bolt in the middle but you can really see it in person.. next time I might have to try a deeper shade of gold.  I only did 3 fingers because the other two I messed up so I took it off and painted Essie cute as a button instead. I think this looks really cool!!  Will I try this nail design again? Maybe if I have more time to waste, or I could just do this on my accent nail.  I love this look because its really girly and soft..On nailside blog she did a lot of this lighting bolt design and she also did a tutorial on this so you can go check it out if you like to achieve this look.

What  I used:

  1.  Essie- Van d'go as a base coat.
  2. Essie buy me cameo as my next layer
  3. Essie- cute as a button
  4. Scotch clear tape.

I posted the photos in the order I did my thunder bolt. I hope you guys enjoy this look! Sorry for the poor quality of photos.


Sunday, August 7, 2011

Essie- French affairs with Teenage dream


 Hey Ladies, this will be a quick post because I will redoing my nails today!  I still have the cupcake nails on for several days now which is a long time! But anyway.. this swatch I had today was originally suppose to be the base colors for my cupcake to be display on but then  I was impatience of the dry time. This was 2 coats of french affairs and 1 coat of Teenage dream... Man imagine me putting cupcake designs on it which will be a lot more layers and my mani would be really thick which I'm not a big fan of.
I hope you guys like this mani a lone because it reminds me of a princess nails because of the pink and micro glitters on top =D.

The formulation of french affairs was not bad at all.. it only took 2 coats to get the same color as the bottle. Teenage dream glitter nail polish runs a little thicker.. im thinking because it has a lot of micro and some big glitter in them so it will coat your nails really well.  Im not a fan of this color on its own but its great when its paired up with another color.

Essie Nice is Nice with teenage dream


Thursday, August 4, 2011

Cupcake nails


 Hey Ladies! I wanted to break away from the animal print series for a little bit because I dont know what print to do next but today I got a fun happy mani for you =]

 As I was browsing on nail blogs, I came across this cupcake cake nail and I thought it was the cutest thing ever.  Even though my cupcake did not come out nicely, I think it will get better the more practice I get.  Each nail, I wanted to do different colors.. This nail looks busy but it is really fun to wear during summer because its bright and colorful... and who doesn't like cupcakes? Why not put it on your nails.  I was intentionally going to do a step my step tutorial but I failed at taking pictures HAHAHAH =p

Anyway ,this was a very easy nail art.. it took me 30 minutes because each layer needed to be dry before you can add more layers to it. I think everyone can do this look because the only tool I used was bobby pin or dotting tools.  What else do you need? well a bunch of cute colored nail polish .. one for each of your fingers.


What to do:

  1.  First pick a base color .. make sure you pick the base colors that will be contrasting colors as your frosting of your cupcake or it will not stand out. I picked OPI-teenage dream but it was not vibrant enough so next time I think i might pick another color. (First Photo)
  2. Paint the tips of check of your nail almost half way down the middle of your nails.  Wait for that to completely dry or dry enough to add some stripes to the colored tips.
  3. Stripes for the colored tips.. I picked contrasting colors and used a dotting tool to paint it on. When using the dotting tools, it gives it more of a raggy line which looks more realistic.
  4. When the tips are dry, start adding the frosting to the nails. What I did with the frosting was made small hills on the nails if you know what  I mean.
  5. Then after that is dry I added sprinkles and a heart glitter I got from my jordana
  6. Add a nice amount of topcoat then your finished!


I hope you guys enjoy this kiddy look!

XoXo
Amanda N

Tuesday, August 2, 2011

Animal Print series: Tiger nails


Hey ladies! So my last post was Giraffe nails and I wanted to stick to the Animal Print theme for a little while before I'm tired of it.
At first my next animal print was going to be snow leopard but it did not turn out good.. The silver I used for the leopard print did not show up very well against the white base and.. yeah it was not pretty.

I never done tiger nails before but I think this turned out pretty cool. Some of the stamping messed up on the tiger stripes but its okay.. I did not want to take it off to start over.


 So what I did was a gradient background color so it would look like a true tiger body and then I added the stripe to it.

Steps:

  1. I first applied China glaze- Breakin as an over base coat 
  2.  I then sponge on the tips to the middle of my nail with China glaze-Solar power
  3. Lastly I use Wet and Wild- sunny side up to blend in the two colors by sponging it in the middle up to the china glaze- breakin
  4. Then I use my Stamp from konad and stamped on the tiger stripes
  5. Out the door top coat


I hope you guys enjoy this look!


XoXo,

Amanda N

Monday, August 1, 2011

Animal Print series: Giraffe nails


Hey guys! This is what I have on my nails for the last couple of days.  Originally I wanted to do Giraffe nails because of the image plate print but the more I look at it it looks like a sick cow nails LOL!  Oh well... I know giraffe spots are more defined but my hand is not steady enough to do that. Maybe next time. Next time I think I will use the same image plate to do Cows nails or something because I think this is the spots for cow nails but I cant say its My cow nails because of the color combination I used. I really want to do marbling next  so stay tune for that =]


So what I used :

  • Nail tek as my base coat because this helps me with chipping and peeling nails
  • China glaze lemon fizz - this is a pastel yellow. I use this color because of the giraffe body color
  • for the spots I used milani teddy bare as the spots.  Milani - Teddy Bare is a good dupe for Chanel- Particuliere
  • Out the door top coat.


XoXo
Amanda N